


For those of us in shitcoin trenches spending 16 hours a day in front of a screen, slamming white monsters, and having absolutely no interactions with the outside world, trading bots have been an absolute revelation.
Remember what trading shitcoins were like before? Open Uniswap or Raydium, manually adjust the slippage, confirm the transaction (tx), and then adjust the gas then after approving the tx you wait till it gets finalized, and within this time, the coin has already pumped another 3x, and you smash another hole into your desk.
The regular DEX UX is painful.

To combat this, we saw the rise of Telegram (TG)- based trading bots, popularised by Banana Gun, Wagie Bot, and Unibot.
Initially, this new meta was met with a wave of criticism, and rightfully so. The main concern with anything crypto-related is always the security of funds and self-custody.
With these bots, people would share the private keys of their main wallets to be able to trade with them through the bots, which is incredibly risky. All your funds are basically at risk.
Eventually, this concern was quelled as users could directly generate new wallets through the bot and send funds to that wallet.
Now, a TG trading bot is a mainstay in any on-chain trader's arsenal. In fact, using a DEX almost feels like a thing of the past. You can snipe contracts, buy, sell, and manage all trades on your phone on Telegram easily.
But on-chain trading is more complex than you might think. Considering LP structure, MEV, sniping bots, and other factors, there are many different strategies a user can use to maximize their profitability.
Therefore, the job of a TG bot is to provide users with the tools that simplify all of this. They need to provide various features that give traders the flexibility to adjust their strategies as they see fit. The winning TG bot can only differentiate itself with the features it provides.
This brings us to today's topic: ReadySwap, a bot that offers a plethora of new features that allow you to take your on-chain trading game to the next level.
So, enough chit-chat, let me show you why you must start using ReadySwap ASAP.
ReadySwap: Overview
For the moment, ReadySwap is exclusively on Solana. With Pump.fun making it so easy to launch shitcoins that even your grandfather can make his own coin; there’s no better place for ReadySwap at the moment than Solana.
Let’s start with getting set up.
The wallet
When you open the ReadySwap bot on TG, you will see the following page.

Select the language of your choice, and the bot will automatically generate a wallet for you with the private key.
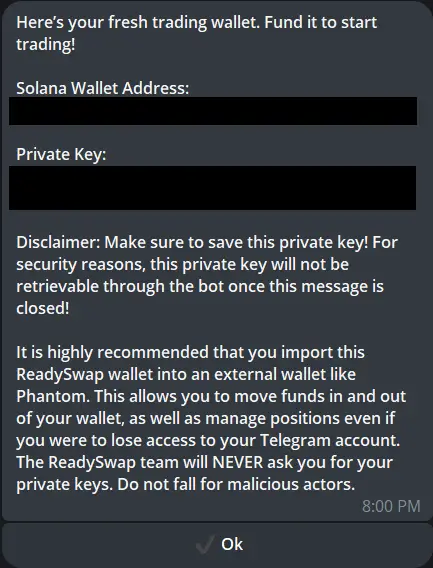
As it says in the message, it’s important to store your private key safely because it won’t be shown again. The other benefit is that generating a new wallet by default mitigates the security risks of sharing the private key from another wallet.
However, if you really want to import an existing wallet, you can use the “/Wallets” command.
Here, you will get an option to import an existing wallet where you will need to put in your private key and follow any additional steps. After that, you should be all set.
Okay, so you now have your wallet loaded with funds. The next step is to personalize your wallet according to your preferences.
Settings
This is where ReadySwap separates itself from the crowd. The level of customizability, in addition to additional feature offerings, can propel them to the position of the best TG bot in this industry.
You can access the settings menu by typing “/settings” in the chat, after which you will have five different options:
- General settings
- Trade settings
- Limit order settings
- Auto Buy
- Trade presets
General settings
The general setting is where you can set your SLs and TPs. Stop Losses and Take Profits—for those who are unaware.
It’s pretty easy to do.
You click on the SLTP button, and you can set the SL and TP separately or simultaneously.
Let’s say you want to set an SL at -50%. You put -50/100. The hundred signifies how much quantity you would like to sell.
If you want to sell everything at -50%, you put 100, but you can also put 50 if you would only like half to be sold.
The same thing is done for TP. Put the percentage increase amount followed by quantity. So, you input 400/50 to sell 50% of your stack after a 400% increase. Pretty simple.
If you would like to set both together, you can do it like this: The order is SL/TP/quantity. So you can input -50/400/100. This means your SL is -50%, your TP is 400%, and if any of these hits, 100% of your quantity will be sold.
Once this is set up and you paste a contract to trade, you will see the options at the bottom.
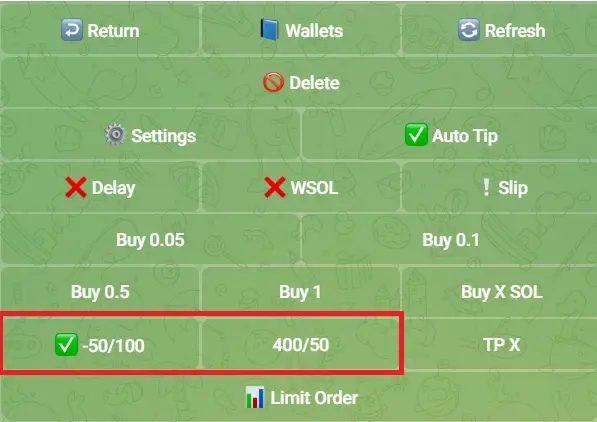
You can select when you want it to be active, and it will be active for all subsequent trades until you deactivate it. If you want more customisability over specific transactions, use the “limit order” button below (more on this later).
Trade Settings
Here, you can set up the finer details for your trading. This includes things like slippage and gas fees per TX settings.
Under trade settings, there are three broad categories:
- Buy Panel
- Sell Panel
- Auto Tip
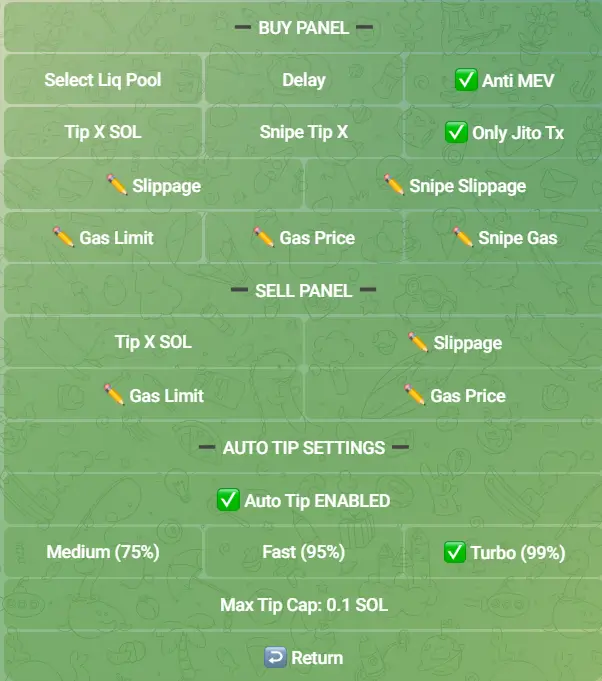
Buy Panel
The first option under the Buy panel allows you to select a liquidity pool. When you input one, it basically allows you to interact with that specific pool.
Then, you have a “delay” option. This is pretty self-explanatory. Suppose you want to snipe a new contract but think it will be Jito targeted and insta dumped. You can delay your buy, to buy after the dump.
You can also do the reverse, where you put a negative time so the bot sends TXs before the launch.
The bot sets the time in milliseconds. So, if you input 5000, it will delay your buy by five seconds. But, say you put -5000, it will start spamming txs five seconds before the launch, assuming that you know the launch time.
The other option is “Anti-MEV,” which is turned on by default. It doesn’t really impact execution speed, so there’s no need to turn it off.
Then you have the “Tip” feature. This option is for you if you want to trade on Jito validator slots. You can set a tip and ensure that your transaction gets included. Jito also has MEV protection, so it's not an issue. The recommended tip, according to the team, is 0.1 SOL, but you can go up to 1-3 SOL for very competitive launches.
If you want all trades to go through Jito Validators, select the “Only Jito Tx” option.
Note that there are two tips: a normal tip and a snipe tip. The normal tip is the tip you will pay for a manual buy, and the snipe tip is the amount you will pay if you snipe a contract.
Then, you have your slippage settings. You must set separate slippage for manual buys and snipes. The default is 100% slippage, but you can adjust it according to your risk profile.
The transaction will revert if the price changes more than your slippage preference before confirmation, so you’re probably better off leaving it at 100% for sniping.
Lastly, you have the gas fee options.
The “Gas Limit” and “Gas Price” options are simply additional fees you can include if you want your transaction to have higher priority.
The “Snipe gas” comes in for launches that are unlisted. A launch can either be time-listed or unlisted. If it’s time listed, a countdown timer will show up on your trading page, and your regular gas settings will be used. But your “Snipe Gas” setting will be used if it's unlisted.
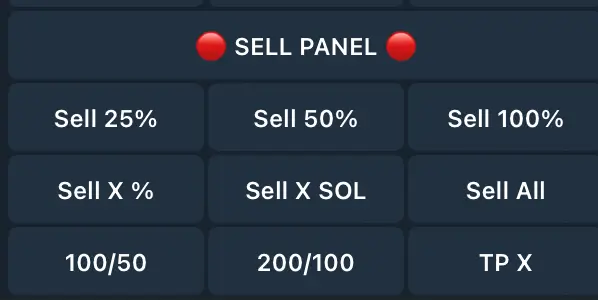
Sell Panel
The Sell Panel is more of the same.
You can set a tip to ensure that your transaction gets higher priority, set a sell slippage setting based on your risk preference, and set additional gas fee amounts if you would like your transaction to get even higher priority.
Auto Tip
If you can’t figure out the optimal tip, I suggest using the Auto tip feature.
It essentially dynamically adjusts your tip based on current rates and market conditions. You get three options: medium, fast, and turbo. You can select whichever one you prefer and it will automatically tip the most optimal amount for each speed.
Don’t forget to set a max tip cap tho. Say you set your max tip cap to 0.1 SOL and have the turbo option selected. In highly contested launches, the optimal tip could go up to 0.3 SOL, but you have nothing to worry about if you have a max tip cap set. It won’t spend more than that.
Limit Order Settings
When you create your limit order settings, they are the exact same as the market buy settings mentioned above. The only difference is that there is the additional option of a “Limit Protection %.”
The shitcoin game is brutal; coins can nuke 90% within seconds for many reasons.
Imagine if you had a limit set on one of these coins, which was 20% off the current highs. The token nukes 90% because the dev has to pay rent. Your limit order hits, but the coin still went to 0, and you lost it all (again).
Instead, you can set a limit protection at, say, 40%. So if the coin insta-nuke is 90%, your limit protection will be considered, and the order won’t trigger.
Auto Buy
This feature should be left to the people who know what they’re doing.
This feature is turned off by default, but if you do choose to turn it on, it will automatically buy any forwarded contract that you send to the application. Regardless of price or timing, the bot will automatically buy it.
So, only use this if you know what contract you are sending and exactly what you are doing in general.
Trade Presets
Over here, you can set the default gas and tip settings for your trading setup.
You will see this when you click on the “Trade Presets” option.
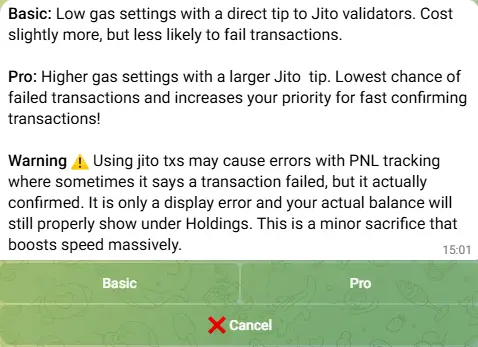
You have two options.
The Basic option is cheaper but has a slightly higher chance of transaction failure.
The Pro option is more expensive but has an extremely low chance of transaction failure.
The choice is up to you based on your general tolerances and preferences.
Buying & Selling
This is probably the most important part of any bot.
If any of you are frequent users of TG bots, then this interface will be familiar to you. It looks a little like this.
Find the coin you would like to ape and paste the CA into the chat. After that, you will see this.

In the top half, you will see all the details about the coin—the DEX, market cap, price, and liquidity.
On the bottom half, you will have your trading interface with all the settings you put in from before. Activate whichever setting you want based on the trade being made and buy whatever quantity you would like.
It’s the exact same process for sniping. Paste the CA of the contract you would like to snipe. If there’s a preset timer, the countdown will show up. Then, you input how much you want to buy, and you can go about your day.
Now, you may be wondering what WSOL is. Using WSOL essentially enhances the speed of your orders since it’s a native SPL token. In a regular tx, the bot first converts SOL to WSOL and makes the trade. However, if you have the setting turned on, it will already have WSOL ready to make your trade quicker.
Note that if you turn on WSOL, leave some SOL behind to pay for gas.
Once you’ve made your purchase, the sell panel will show up.
You can use a preset percentage to sell a desired amount of tokens, or you can input a SOL amount that you would like to sell of the token.
The difference between sell all and sell 100% is that sell 100% will sell all the tokens for the specific selected wallet(s). If you click sell all, it will sell the token from all your wallets.
Limit Orders
Limit orders are an important part of any trading experience. The limit order feature is very easy and intuitive on ReadySwap.
When you paste a CA, click on the “Limit Order” button at the bottom and then click on the “Buy Limit” option on the top right.
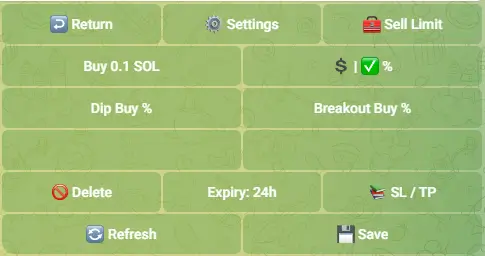
Use the “$|%” button to choose how you would like to place your limits. The green tick will show up next to the option you selected. Then, use the “Dip Buy” or “Breakout Buy” options to set your criteria for the limit order. Set your TP/SL for the order, and you’re all set.
An additional feature to keep in mind is the expiration feature. It essentially decides when your buy or sell limit order expires. It’s set to 24 hours by default, but you can change it to whatever you like.
If you want to sell, you will see the following menu.
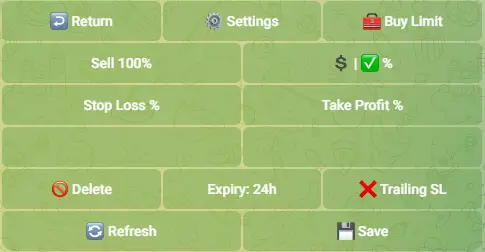
The process is very similar to the buying limit method in that you select $ or %, fill in your stop loss, take profit limit order criteria, and bang, you’re good to go.
However, arguably the most useful feature of this panel is the “Trailing SL” feature. It can essentially be a way for you to secure more profits without constantly needing to watch your positions like a Hawkeye. You can actually touch grass.
When setting a trailing SL, you essentially select a percentage. Say you set it to -20%. The SL will follow the price. So, as the price goes up, so will your SL. It will only trigger when the price drops 20% from its most recent highs.
No more roundtripping.
Managing Trades
Now, let’s say you have already placed your trade and are going to touch your grass. It's unlikely, but for the sake of this article, let’s assume some of us do this.
When you come back and want to manage your trade, there are two things you can do. You can either paste the CA in the chat, and your trade will show up, or you can use the “/portfolio” command to see your current positions.
You’ll get all the up-to-date information about all your trades and then manage your positions accordingly.
Withdrawing SOL
Now, let's imagine the unlikely scenario where we’re actually profitable. You have a lot of extra SOL and want to move it to your main wallet or some other wallet.
You click on the “/wallet” tab, and you will see this.
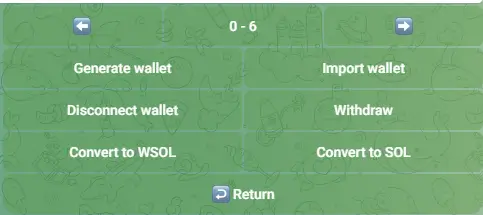
Click on the “withdraw” button.
From there, select “send SOL” and paste the address where you would like to withdraw your SOL. Once that is done, input an amount and confirm the transaction, and your SOL should be in your desired wallet very shortly.
If you have made it this far, you should have a proper understanding with regards to how ReadySwap works. But there’s one more thing to touch upon before we end this.
The tokenomics.
Tokenomics
The token started at a total supply of 10,000,000, but the supply has been gradually decreasing due to its buyback and burn mechanism. The current circulating supply at the time of writing is 9,217,183.
The distribution is as follows:
- 25% - Seed round
- 25% - Airdrop to TUF holders (Claim now finished)
- 14% - liquidity
- 10.5% - Treasury
- 10.5% - Marketing
- 10% - Future CEX listings
- 5% - Team and advisors
A couple of things to note here are that 100% of the seed round tokens were available at TGE, and there was no vesting. The unlocked tokens allocated to the treasury, marketing, and CEX listings are stored in the ReadySwap multisig, which you can check here.
Now, let’s get into the juicier details.
ReadySwap will have a referral program where you can generate a ref link and get 20% of the trading fees generated through the people using your ref link.
This return can be boosted through the loyalty program. The more wallets on your ref link, the higher your potential return. There are five tiers.
- 20 active wallets - 22%
- 40 active wallets - 24%
- 60 active wallets - 26%
- 80 active wallets - 28%
- 100 active wallets - 30%
The max you can get here is 30%.
ReadySwap charges a 1% fee on all buys and sells on the bot. This fee revenue is used to first pay referrals. Then 58% is used for buy-back burn and revenue sharing, 6% goes to the Shilluminati DAO treasury, and 6% goes to the ReadySwap treasury. Then, 30% of it is taken as dev fees.
So, roughly 70% of the bots' revenue goes back into the ecosystem, which makes it one of the best in terms of revenue feedback in the entire sector.
Now, let me talk a little more about revenue share. To be eligible for revenue share, you must hold at least 10 RS tokens. The more you hold, the higher the revenue share you will get, which is claimable every 24 hours on the claims dashboard.
They employ a time-weighted boost to their revenue share model, so the weight of your tokens held increases by 5% every day as long as you keep holding them. If you sell any tokens, the boost is reset.
Essentially, it is a way to better reward the long-term holders of RS without them needing to spend more.
Concluding Thoughts
This product is built by the TUF team and advised by Shilluminati DAO, both of which have an excellent track record for making top-notch DeFi products.
ReadySwap is another remarkable example of a product built for degens by degens. They ticked every box with this one and have essentially made your Solana trading experience as easy as can be. The only thing left is for us to pressure them into building on multiple chains.
I will certainly be a frequent user of ReadySwap, and you should, too.


